JavaScript 原型链
引入
为什么要原型对象
function Person(name, age) {
    this.name = name;
    this.age = age;
    this.info = function () {
        console.log(name + "年龄:" + age);
    }
    // [1] 可写可不写
    return this;
}
let p1 = new Person('x', 18);
let p2 = new Person('xiaou', 20);
// false
console.log(p1.info === p2.info);
在这里 info 方法的作用是一样的但是每个对象都拥有自己的 info 方法那么这样如果使用 Person 对象越来越多的话会出现大量的内存浪费这时候「原型及原型链」就出现了。
在 [ 1 ] 处的返回语句是可写可不写,因为 JS 构造函数返回值如果是 「String,Number,Boolean,Null,Undefined」的情况将会忽略 return 的返回值, 但是如果返回值是 Object 的话将不会再返回 this 对象。
即: 默认不写的情况下不写 return 情况下,构造函数实例化返回的就是 this
使用原型链后
function Person(name, age) {
    this.name = name;
    this.age = age;
}
Person.prototype.info = function () {
    console.log(name + "年龄:" + age);
}
let p1 = new Person('x', 18);
let p2 = new Person('xiaou', 20);
// true
console.log(p1.info === p2.info);
原型及原型链
JavaScript 基本世界
null 对象是JavaScript 一切的起源, 但是 null 但是 null 代表着无这么产生对象丫,使用 无(null)中生有术() 创建一个 No.1 的对象继承于 null (null 对象生出了 No.1)。但是 null 不想再生了时候 null 对象把自己孩子的基因给基因工厂 (Object ) 让 Object 生成新的对象。
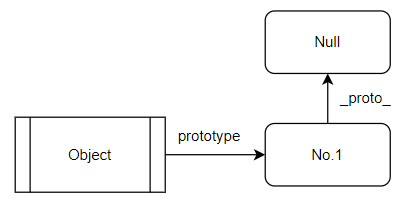
而基因工厂(Object)为了更好的创造不同类型对象将创建对象的机器分成了
String:用来制造表示一段文本的对象。
Number:用来制造表示一个数字的对象。
Boolean:用来制造表示是与非的对象。
Array:用来制造有序队列对象。
Date:用来制造表示一个日期的对象。
Error:用来制造表示一个错误的对象。
……
但是后面 No.1 对象发现自己可以自己开工厂自己赚钱他和 Object 商量你可以继续使用我的基因但是需要到我成为我新公司的子公司。
这时结构发生改变
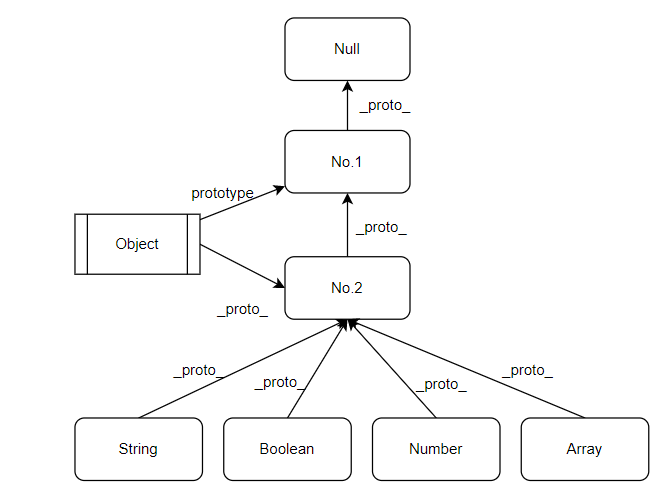
基因工厂分类的机器也需要各自有一个模板对象这时需要到 No.1 基于基因
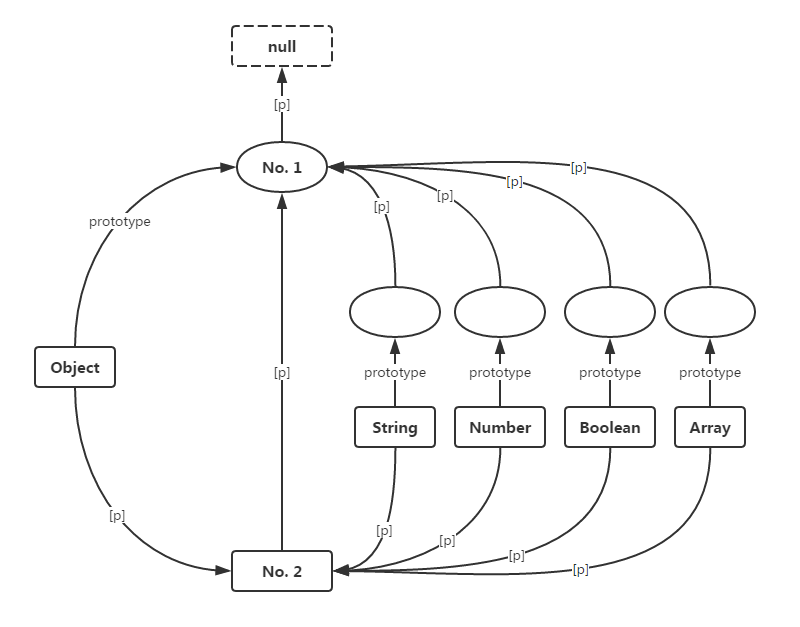
这时候 No.2 公司发现了有很多对象种类需要被创建但是自己已经忙了这时需要一个制造机器的机器所以 No.2 使用自己的模板创建了一个 Function 机器
Function.__proto__ === Function.prototype
看这张图突然发现 Function 可以生产 Object 对象还有其他对象
JavaScript 时间齿轮开始转动了
机器越来越多但是都是静态的, No.1 开始生产出一些有一些的行为给机器
再回过头来看这段代码
function Person(name, age) {
    this.name = name;
    this.age = age;
}
Person.prototype.info = function () {
    console.log(name + "年龄:" + age);
}

let p1 = new Person('x', 18);
let p2 = new Person('xiaou', 20);
//[1] true
console.log(p1.info === p2.info);
//[2] true
console.log(Person.prototype === p1.__proto__);
在 JavaScript 世界中创建了 Person 机器使用模板 info 的行为,p1 和 p2 都是使用 Person 机器制造所以使用的是相同的模板所以是 true
生产出来的对象继承于制造时候使用的模板, 因为 p1 是 Person 使用模板制造的当然 p1 模板 = Person 制作对象的模板即: 「构造器.原型 = 制造对象.原型链」
机器启动 new 关键词
使用机器制造对象都知道使用 new 关键字实现但是这个 new 到底给我们做了什么呢?
我们向对 new 关键字进行探究。
function P1() {
    this.name = "name";
    console.log(this);
}
P1.prototype.say = function () {
    console.log(this);
}
const p = new P1();
console.log(p);
得到一个新的 Object 的实例
构造器和实例的方法 this 指向这个实例本身
每个实例的`__proto__`指向构造函数的原型对象
接下来探究一下如果在构造方法里面返回值回出现什么情况
function P1() { return 1;}
function P2() {return undefined;}
function P3() {return false;}
function P4() { return { name: 'name' };}
function P5() {return null;}
function P6() { return 'hello';}
function P7() { return this;}
function P8() { return [];}
function P9() {  return Symbol("666");}
function P10() {  return 11n;}
console.log("p1 return number", new P1()); // this
console.log("p2 return undefained", new P2()); // this
console.log("p3 return boolean", new P3()); // this
console.log("p4 return object", new P4()); // {name: 'name'}
console.log("p5 return null", new P5()); // this
console.log("p6 return string", new P6()); // this
console.log("p7 reutrn this", new P7()); // this
console.log("p8 return array", new P8()); // []
console.log("p9 return Symbol", new P9()); // this
console.log("p10 return bigInt", new P10()); // this
发现返回对象和数组时候会 new 出现得不到实例而是构造器的返回值。
知道 new 工作机制岂不是直接我们自己也可以写一个 和 new 一样功能的函数
[new.target](https://developer.mozilla.org/zh-CN/docs/Web/JavaScript/Reference/Operators/new.target)
function newOperator(ctor) {
    if (typeof ctor !== 'function') {
        throw ctor + 'is not a constructor';
    }
    // 这 target 是告诉构造函数用户使用了 new 运算符
    newOperator.target = ctor;
    // 下面两行等价于 const obj = Object.create(ctor.prototype);
    const obj = {};
    // 给制造的实例对象给他原型(基因模板)
    obj.__proto__ = ctor.prototype;

    // 获取传递给构造器参数
    const param = Array.prototype.slice.call(arguments, 1);

    /**
     * Function.apply(obj, args)方法能接收两个参数
       obj:这个对象将代替Function类里this对象
       args:这个是数组,它将作为参数传给Function(args-->arguments)
     */
    const instance = ctor.apply(obj, param);
    // 返回值判断值
    const isObject = typeof instance === 'object' && instance !== null;
    const isFunction = typeof instance === 'function';
    if (isObject || isFunction) {
        // 返回构造器返回的对象
        return instance;
    }
    // 返回实例对象
    return obj;
}
测试
function Person(name) {
    this.name = name;
    this.hobby = ['read a book'];
}
Person.prototype.readBook = function () {
    console.log(this.name + ' JavaScript 666');
}
const a = newOperator(Person, 'xiaou');
// xiaou JavaScript 666
a.readBook();
继承
生产出来的对象行为在其他的对象包含
1. 原型链继承
原型链继承的本质是重写原型对象,代之以一个新类型的实例。
构造函数、原型和实例之间的关系:每个构造函数都有一个原型对象,原型对象都包含一个指向构造函数的指针,而实例都包含一个原型对象的指针。
function Person() {
    this.happys = ['read a book'];
}
Person.prototype.info = function () {
    console.log('我是 mark');
}
function Student() { }
// 相当于 Student.prototype.__proto__ == Person.prototype
Student.prototype = new Person();
Student.prototype.goSchool = function () {
    console.log('去学校');
}
let s1 = new Student('xiaou', 20);
在这里是将 Student 的构造函数的继承对象 (亲身父亲) 变成 Person 原型链对象(模板), 这样完成了继承下面是 new 出来的实例对象。
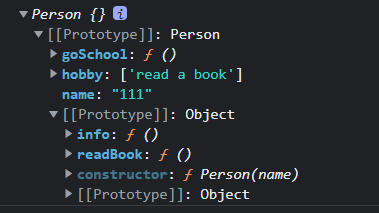
这种函数有很多缺点
多个实例对引用类型的操作会被篡改
这种情况主要是因为 Person 对象加载在原型链上而原型链上的对象都是共享的
    let s1 = newOperator(Student);
    s1.hobby.push("running");
    console.log(s1.hobby); // ['read a book', 'running']
    let s2 = newOperator(Student);
    console.log(s2.hobby); // ['read a book', 'running']
子类型的原型上的 constructor 属性被重写了
   Student.prototype = new Person('111');
   Student.prototype.constructor = Student;
给子类型原型添加属性和方法必须在替换原型之后,不然会被覆盖丢失。
创建子类型实例时无法向父类型的构造函数传参
2. 借用构造函数继承
使用父类的构造函数来增强子类实例,等同于复制父类的实例给子类(不使用原型)
// 父类
function Person(name) {
    this.name = name;
    this.happys = ['read a book'];
    this.addHappys = (happys) => {
        this.happys.push(happys);
    }
}
Person.prototype.sayHello = function () {
    console.log(`${this.name} hello`);
}
// 子类
function Student(name) {
    Person.call(this, name)
}
const a = new Student("xiaou");
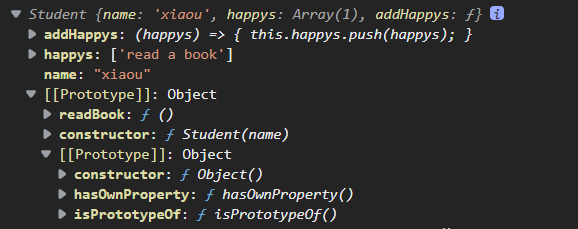
通过上面截图很明显发现这种继承的缺点
只能继承父类的实例属性和方法,不能继承原型属性/方法
无法实现复用,每个子类都有父类实例函数的副本,影响性能
3. 组合继承
组合上述两种方法就是组合继承。用原型链实现对原型属性和方法的继承,用借用构造函数技术来实现实例属性的继承
function Person(name) {
    this.name = name;
    this.happys = ['read a book'];
    this.addHappys = (happys) => {
        this.happys.push(happys);
    }
}
Person.prototype.sayHello = function () {
    console.log(`${this.name} hello`);
}
function Student(name) {
    Person.call(this, name)
}
Student.prototype.readBook = function () {
    console.log(`${this.name} 爱看书`);
}
Student.prototype = new Person();
Student.prototype.constructor = Student;

const a = new Student("xiaou");
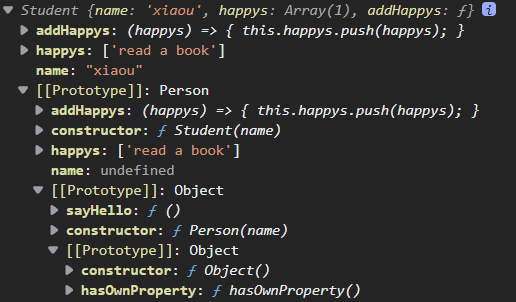
通过上面截图很明显发现这种继承的缺点
第一次调用
Person():给Student.prototype写入两个属性name,happys。第二次调用
Person():给a写入两个属性name, happys
4. 原型式继承
利用一个空对象作为中介,将某个对象直接赋值给空对象构造函数的原型。
// 这个方法相当于 Object.create()
function object(obj) {
    function F() { }
    F.prototype = obj;
    return new F();
}
var person = {
    name: "Nicholas",
    happys: ["read a book"]
};

const stu1 = object(person);
const stu2 = object(person);
stu1.gender = '男';
stu1.happys.push("222");
console.log(stu1);
console.log(stu2);
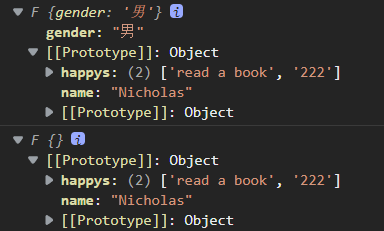
// 构造方法实现
function Person() {
    this.name = 'a';
    this.colors = ['red', 'yellow']
}
Person.prototype.age = 18;
const child1 = object(Person.prototype);
console.log(child1);
通过上面截图很明显发现这种继承的缺点
原型链继承多个实例的引用类型属性指向相同,存在篡改的可能。
无法传递参数
如果父类是构造函数,无法继承父类构造函数中的属性,只能继承父类构造函数的原型对象的属性
5. 寄生式继承
在原型式继承的基础上,增强对象,返回构造函数
function object(obj) {
    function F() { }
    F.prototype = obj;
    return new F();
}
function createAnother(original) {
    // 通过调用 object() 函数创建一个新对象
    var clone = object(original);
    // 以某种方式来增强对象
    clone.sayHi = function () {
        console.log("hello");
    };
    // 返回这个对象
    return clone;
}
var person = {
    name: "xiaou",
    happys: ["read a book"]
};
var a = createAnother(person);
a.sayHi(); //"hi"
console.log(a);
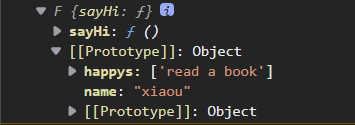
这种继承方式缺点也名明显
原型链继承多个实例的引用类型属性指向相同,存在篡改的可能
无法传递参数
6. 寄生组合式继承
这是最成熟的方法,也是现在库实现的方法
function inheritPrototype(subType, superType) {
    // 创建对象,创建父类原型的一个副本
    const prototype = Object.create(superType.prototype);
    // 增强对象,弥补因重写原型而失去的默认的constructor 属性
    prototype.constructor = subType;
    // 指定对象,将新创建的对象赋值给子类的原型
    subType.prototype = prototype;
}

// 父类初始化实例属性和原型属性
function Person(name) {
    this.name = name;
    this.happys = ['read a book'];
}
Person.prototype.sayHello = function () {
    console.log(this.name + " hello");
}
// 借用构造函数传递增强子类实例属性(支持传参和避免篡改)
function Student(name, age) {
    Person.call(this, name);
    this.age = age;
}

// 将父类原型指向子类
inheritPrototype(Student, Person);

Student.prototype.sayAge = function () {
    console.log(this.name + "年龄" + this.age);
}
// test
const stu1 = new Student("xiaou", 18);
const stu2 = new Student("xz", 22);
stu1.happys.push("11")
console.log(stu1);
console.log(stu2);
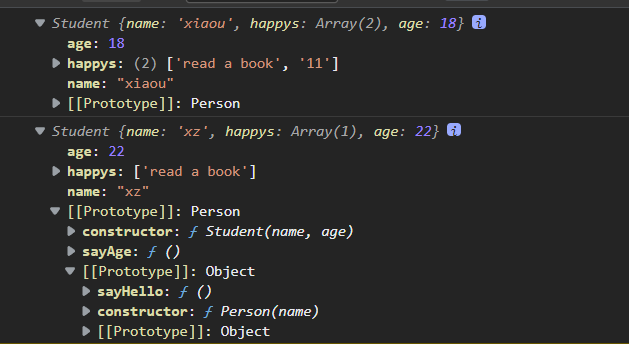
这个例子的高效率体现在它只调用了一次SuperType 构造函数,并且因此避免了在SubType.prototype 上创建不必要的、多余的属性。于此同时,原型链还能保持不变;因此,还能够正常使用`instanceof` 和isPrototypeOf()
7. 混入方式继承
function Person() {
    this.age = 18;
}
Person.prototype.sayHello = function () {
    console.log(this.name + "hello");
}
function Student(name) {
    this.name = name;
}
Student.prototype = Object.assign(Student.prototype, Person.prototype);
Student.prototype.constructor = Student;
const a = new Student('张三');
console.log(a);
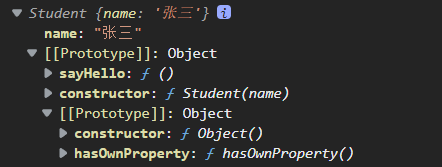
这是方式可以实现“多继承”
function Parent(sex) {
    this.sex = sex
}
Parent.prototype.getSex = function () {
    console.log(this.sex)
}

function OtherParent(colors) {
    this.colors = colors
}

OtherParent.prototype.getColors = function () {
    console.log(this.colors)
}

function Child(sex, colors) {
    Parent.call(this, sex)
    OtherParent.call(this, colors) // 新增的父类
    this.name = 'child'
}

Child.prototype = Object.create(Parent.prototype)
Object.assign(Child.prototype, OtherParent.prototype) // 新增的父类原型对象
Child.prototype.constructor = Child
const child1 = new Child('boy', ['white'])
console.log(child1);
console.log(Child.prototype.__proto__ === Parent.prototype)
console.log(Child.prototype.__proto__ === OtherParent.prototype)
console.log(child1 instanceof Parent)
console.log(child1 instanceof OtherParent)


这是方法缺点也明显
其他父类不能使用 instanceof 进行判断而且实例属性和方法也不能继承只是将自己原型挂到子类原型上
8. ES6类继承 extends
extends 关键字主要用于类声明或者类表达式中,以创建一个类,该类是另一个类的子类。其中 constructor 表示构造函数,一个类中只能有一个构造函数,有多个会报出 SyntaxError 错误 , 如果没有显式指定构造方法,则会添加默认的 constructor 方法extends 继承的核心代码如下,其实现和上述的寄生组合式继承方式一样
function _inherits(subType, superType) {
    // 创建对象,创建父类原型的一个副本
    // 增强对象,弥补因重写原型而失去的默认的constructor 属性
    // 指定对象,将新创建的对象赋值给子类的原型
    subType.prototype = Object.create(superType && superType.prototype, {
        constructor: {
            value: subType,
            enumerable: false,
            writable: true,
            configurable: true
        }
    });

    if (superType) {
        Object.setPrototypeOf
            ? Object.setPrototypeOf(subType, superType)
            : subType.__proto__ = superType;
    }
}
ES5 继承和 ES6 继承的区别
ES5 的继承实质上是先创建子类的实例对象,然后再将父类的方法添加到 this 上(Parent.call(this)).
ES6 的继承有所不同,实质上是先创建父类的实例对象 this,然后再用子类的构造函数修改 this。因为子类没有自己的 this 对象,所以必须先调用父类的 super() 方法,否则新建实例报错。